Using the OpenTelemetry Collector: A Practical Guide
OpenTelemetry’s Collector is a vendor-neutral service that sits between your applications and observability backends. It can receive telemetry data (traces, metrics, logs), process or transform it, and export it to one or multiple destinations. In a production environment, the Collector becomes essential for building a flexible and resilient observability pipeline. Rather than having your apps send data directly to a vendor, you send it to the Collector. This decouples your instrumentation from any specific backend, helping prevent vendor lock-in. It also enables powerful features like batching and retrying exports to handle network glitches, ensuring reliable delivery of telemetry even during outages. The Collector can filter sensitive information (e.g. removing API keys in traces) before it leaves your environment, improving security compliance. By consolidating traces, metrics, and logs through one pipeline, it reduces the need for multiple agents and lowers complexity. In short, the OpenTelemetry Collector is essential for production-grade observability because it provides flexibility, reliability, and control over your telemetry data.

What is the OpenTelemetry Collector?
At its core, the OpenTelemetry Collector is a standalone service (available as a binary or container) that receives telemetry data, optionally processes it, and exports it to backends for storage and analysis. Think of it as a smart relay for your telemetry. Instead of instrumented applications each talking directly to an observability platform, they can all talk to the Collector using standard protocols. The Collector then takes on the heavy lifting of format translation, buffering, batching, and retrying, so your apps remain lightweight. This design leads to a more robust system: you can update or reconfigure how data is processed and where it’s sent without touching application code – only the Collector’s config needs to change. It’s also extensible and supports many data sources and destinations out-of-the-box, making it a one-stop component for telemetry management. In the sections below, we’ll dive into the Collector’s architecture, how to configure it to send data to a vendor (using New Relic as an example), how to deploy it on Kubernetes, and best practices to run it in production.
Architecture Overview
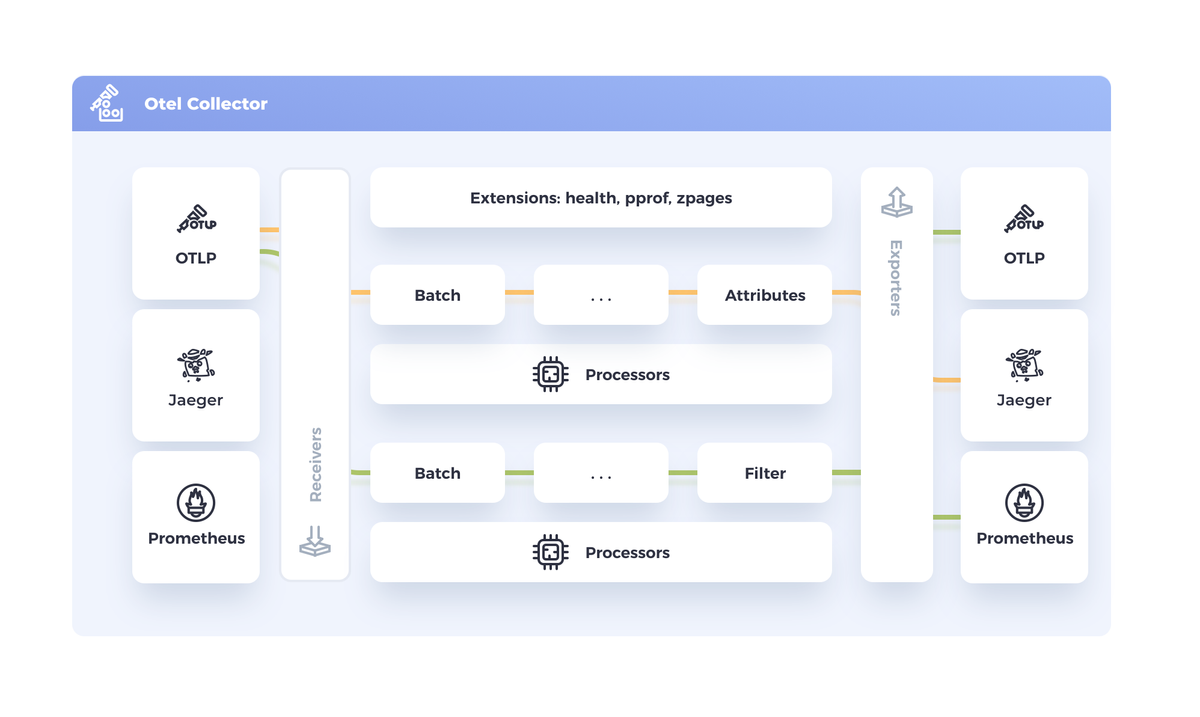
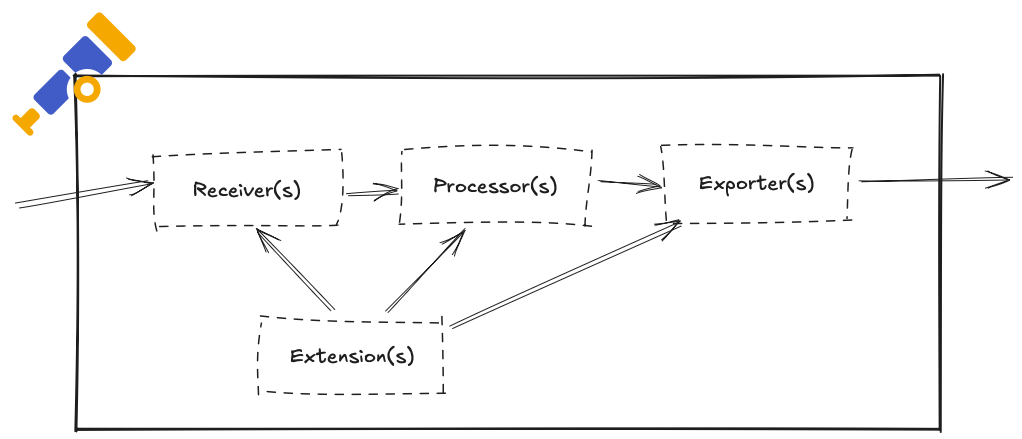
The OpenTelemetry Collector’s architecture is pipeline-based. Each pipeline defines a path that telemetry data follows through the Collector – from input to output. A pipeline is configured for a specific signal type (one for traces, one for metrics, one for logs, etc.), and it consists of three primary types of components: receivers, processors, and exporters. (There are also optional extensions and connectors, which we’ll briefly touch on.)
To visualize this, consider the following flow: an application emits telemetry which is ingested by a receiver; it then passes through one or more processors for enrichment or batching; finally, an exporter sends the processed data out to a backend.
Receivers
Receivers are the entry point of telemetry into the Collector. They “receive” data in various formats and protocols from your applications or other collectors. For example, an OTLP receiver opens endpoints to collect spans, metrics, and logs from OpenTelemetry SDKs, while other receivers can ingest data from sources like Jaeger, Prometheus, Zipkin, FluentBit, etc. You can configure multiple receivers if you need to gather data from different sources. Many receivers support default settings – for instance, simply enabling the otlp receiver will by default start gRPC (on port 4317) and HTTP (on port 4318) endpoints for OTLP data. (These are the standard OpenTelemetry Protocol ports for traces/metrics over gRPC and HTTP.) Receivers might accept one or more signal types; the OTLP receiver, for example, can ingest traces, metrics, and logs in one go. In a Collector config, receivers are listed under a top-level receivers: section, and you’ll later tie them into pipelines.
Processors
After data enters via a receiver, it can pass through processors. Processors are optional components that can transform or enhance telemetry before it’s exported. They can filter out noisy data, mask sensitive fields, add contextual information, or even sample (reduce) traces to control volume. For example, a filter processor might drop certain spans by name, or a resourcedetection processor can attach metadata (like cloud region or Kubernetes pod info) to each span/metric. One crucial processor for production is the batch processor, which groups telemetry data into batches to send in one go – this greatly improves throughput and reduces CPU/network overhead. Another important one is the memory_limiter, which prevents the Collector from running out of memory by monitoring usage and applying backpressure if needed. Processors can be chained in sequence; the data flows through each processor in order. It’s common to include at least a batch processor in every pipeline for efficiency (by default, no processors are active unless you configure them). In your config file, you list processors under processors: and later reference them in pipeline definitions.
Exporters
Exporters are the components that send processed telemetry to your chosen destinations (backends or other systems). An exporter knows how to take the Collector’s internal data and transmit it over a specific protocol to an external service. For example, the otlp exporter can send data to any OTLP-compatible backend (like New Relic’s ingest endpoint) using gRPC or HTTP. There are many exporters available – for logging you might use a logging exporter to print data, or exporters for systems like Jaeger, Prometheus, AWS X-Ray, etc. You can even export to local files or databases if needed. In our case (exporting to New Relic), we will use the OTLP exporter because New Relic accepts OTLP data. An important aspect is that you can attach multiple exporters to the same pipeline if you want to send data to more than one backend simultaneously (e.g., to send traces to both New Relic and an on-premise Jaeger). Each exporter goes under the exporters: section in config, and like receivers and processors, they will be referenced in the pipeline configuration.
Pipelines
A pipeline ties together a set of receivers, an ordered list of processors, and a set of exporters for one telemetry signal. In the Collector’s config, pipelines are defined under the service: section. For example, you might define a traces pipeline that uses the OTLP receiver, some processors (batch, etc.), and the OTLP exporter. This means: “receive all incoming traces from OTLP, process them (batch them, maybe filter), and export via OTLP protocol to the backend.” Each pipeline is dedicated to one data type (traces, metrics, or logs) – you will typically have one pipeline for each type you plan to use. If a component (receiver/processor/exporter) doesn’t support a certain data type, it cannot be included in that pipeline. Also note: if you define a component in the config but don’t include it in any pipeline (or enable it in service), it will be ignored. Below, we’ll see an example configuration that defines pipelines for all three signals.
Extensions and Connectors
The Collector also supports extensions – add-ons that run alongside pipelines to provide extra functionality like health check endpoints, authentication, or pprof profiling – and connectors, which link pipelines together for advanced routing or stream splitting. These are beyond the scope of this guide, but be aware they exist for more complex scenarios.
Configuring the Collector to Receive and Export Telemetry
Configuring the OpenTelemetry Collector is done via a YAML file. The configuration has top-level sections for receivers, processors, exporters, extensions (optional), and service (which defines pipelines). Let’s walk through how to set up the Collector to receive traces, metrics, and logs and forward them to an OTLP-compatible backend. We’ll use New Relic as the example backend – which supports OTLP ingestion – so our goal is to receive OTLP data from apps and export it to New Relic’s endpoint.
Receiver Configuration
Since our applications are instrumented with OpenTelemetry SDKs, the simplest approach is to use the OTLP receiver on the Collector. This will allow the Collector to accept OTLP-formatted spans, metrics, and logs over gRPC or HTTP. By default, enabling the otlp receiver without additional config will open a gRPC port on 4317 and HTTP port on 4318 on all interfaces. We can explicitly specify protocols and addresses if needed. In most cases, the defaults are fine unless you have port conflicts or want to restrict to localhost. For example, to only enable HTTP, you could configure:
receivers:
  otlp:
    protocols:
      http:
      # grpc:  # (you could disable gRPC by omitting it)
(In YAML, leaving http: empty under protocols means use the default bind address 0.0.0.0:4318. Similarly, grpc: would default to 0.0.0.0:4317.)
This otlp receiver will accept traces, metrics, and logs from your apps as long as they export via OTLP. Ensure your application SDKs are configured to send to the Collector’s address (we’ll cover examples in the Kubernetes deployment section).
Exporter Configuration
On the other end, we need an exporter that sends data to New Relic. New Relic’s OTLP endpoint is a cloud URL (otlp.nr-data.net for US accounts, or otlp.eu01.nr-data.net for EU, etc.) that expects OTLP data over HTTPS. We’ll use the Collector’s built-in otlp exporter for this. The key things to configure are the endpoint URL and an API key. New Relic requires you to include your license key as an api-key header on OTLP requests for authentication. In YAML, we can specify headers for the exporter. Here’s an example exporter config:
exporters:
  otlp:
    endpoint: "https://otlp.nr-data.net:4318"    # New Relic ingest endpoint (US region, HTTP port 4318)
    headers:
      api-key: "${NEW_RELIC_LICENSE_KEY}"        # New Relic License key for auth
    compression: gzip                            # (optional) use gzip compression (default is gzip)
    timeout: 10s                                 # (optional) timeout for export requests
A few notes on this exporter setup: We use the HTTPS endpoint on port 4318 which implies OTLP/HTTP. The Collector will automatically append the correct path (/v1/traces, /v1/metrics, etc.) for each data type when sending. We include the api-key header with our New Relic license key – in practice you’d set NEW_RELIC_LICENSE_KEY as an environment variable or Kubernetes secret so it’s not in plain text. We also enabled gzip compression (which is actually the Collector’s default compression setting) to reduce payload sizes, and set a 10 second timeout for export HTTP calls (the default is 5s; adjusting it can help if network latency is high).
Processor Configuration
To make our pipeline production-ready, we should include a couple of processors. The most common is the batch processor. Batching accumulates telemetry data and sends it in chunks (either after a certain size or time interval), which significantly improves export efficiency. Without batching, the Collector would try to send every span or metric as a separate request, which is not ideal. We’ll use default batch settings or tweak them as needed. Another highly recommended processor is memory_limiter, which prevents the Collector from using unlimited memory. It checks memory usage periodically and will refuse new data (applying backpressure) if the Collector exceeds certain thresholds. This way, if the backend is down or slow and data backs up, the Collector won’t just eat all memory – it will signal to clients to retry later (which the OpenTelemetry SDKs do automatically with exponential backoff). We can configure memory_limiter with a limit relative to the container’s memory. For example, if we give the Collector 512 MiB of RAM in Kubernetes, we might set limit to ~400 MiB and a spike allowance of 100 MiB.
Our processors config might look like:
processors:
  batch:
    send_batch_size: 1024           # number of spans/metrics per batch (example)
    timeout: 5s                     # send every 5s if batch not filled
  memory_limiter:
    check_interval: 1s
    limit_mib: 400                  # hard limit ~400 MiB
    spike_limit_mib: 100            # extra allowance for spikes
The above batch config is just an example; often the default batch settings (like 8192 spans or 200ms timeout) are fine, but you can tune as needed. For memory_limiter, when memory usage goes beyond (limit - spike), the Collector starts refusing new data until memory is freed. This triggers client SDK retries (or data drop if the client doesn’t retry). In practice, the OTLP exporters in the SDK will retry by default on receiving a retryable error, so this mechanism helps throttle to avoid crash while signaling upstream to slow down.
Putting It Together
Now let’s combine these into a full Collector configuration that covers traces, metrics, and logs. In one YAML file, we’ll define our receiver(s), processors, exporter(s), then configure pipelines for each signal type. Below is a sample collector-config.yaml:
Under service:pipelines, we defined three pipelines: one for traces, one for metrics, one for logs. In each, we list the components it uses. Here all three pipelines use the same receiver (otlp), same processors (memory_limiter, batch), and the same exporter (otlp). This effectively routes all incoming telemetry to New Relic with memory protection and batching in place.
You can of course customize this. For instance, you might only want to collect traces and metrics but not logs – then you could omit the logs pipeline and even disable log reception on the OTLP receiver. Or if you wanted to send metrics to a different backend (say, Prometheus remote write) and traces to New Relic, you’d configure two exporters and use each in the respective pipeline. The Collector’s config is very flexible.
Verifying the Config: Once you have your YAML, you can run the Collector locally to test it. For example, using the official Docker image:
This would start the Collector, and you could point a test application’s OTLP exporter to localhost:4318 and see if data shows up in New Relic. The Collector logs will also indicate if it’s receiving data or encountering errors. In production, you’d likely run the Collector as a service or sidecar – which leads us to deployment models, especially in Kubernetes.
Deploying the Collector in Kubernetes: Sidecar/Agent vs Gateway
When running on Kubernetes, the OpenTelemetry Collector can be deployed in two common patterns: as an agent (close to your application pods, often a sidecar or a daemonset on each node), or as a gateway (a centralized service within the cluster). Choosing the right model (or using a hybrid of both) will impact the network architecture of your telemetry data. Let’s explain each:
Agent Deployment (Sidecar or DaemonSet)
In the agent model, you run a Collector alongside your application instances to collect data locally. “Sidecar” means adding a Collector container to your application’s Pod, whereas “DaemonSet” means a Collector pod runs on every node (collecting for all apps on that node). In both cases, the Collector is co-located with the application processes. The advantage is that telemetry is sent over localhost or node-local network, which is faster and more reliable (no extra network hop). This also makes it easier to tag telemetry with host-specific metadata (like Kubernetes pod or node info) using processors, since the Collector has visibility into the local environment. Essentially, the agent pattern brings the Collector to where the data is.
In Kubernetes, the DaemonSet approach is very popular for OpenTelemetry: you deploy a DaemonSet so that each Kubernetes node runs one Collector instance. All apps on that node can be configured to send to localhost:<port> (or host IP) where the agent is listening. This avoids running one Collector per app, which could be wasteful if you have many microservices. (It’s still a valid approach to use sidecars, especially if different services need very different Collector configurations, but a DaemonSet tends to be simpler to manage overall.) New Relic’s documentation, for example, recommends deploying the Collector as an agent on every node to receive telemetry locally.
How to deploy as a DaemonSet: You would create a DaemonSet manifest for the Collector. This is similar to deploying any other DaemonSet: each pod will run the Collector container with your config mounted. For instance, a simplified example manifest:
In this manifest, we mount the config from a ConfigMap and expose ports 4317/4318. We’d also likely include a resourceblock to cap CPU and memory, because you want to ensure the Collector doesn’t exceed allocated resources on each node. Once this DaemonSet is running, each pod (Collector) will listen on those ports. Your application pods should then be configured to send OTLP data to the node’s address. If using environment variables in the SDK, for example: OTEL_EXPORTER_OTLP_ENDPOINT=http://<node-ip>:4318. Kubernetes downward API can inject the node IP into a pod env var (using status.hostIP). If using sidecar deployment instead, the app would send to localhost:4318 since the Collector sidecar shares the pod network.
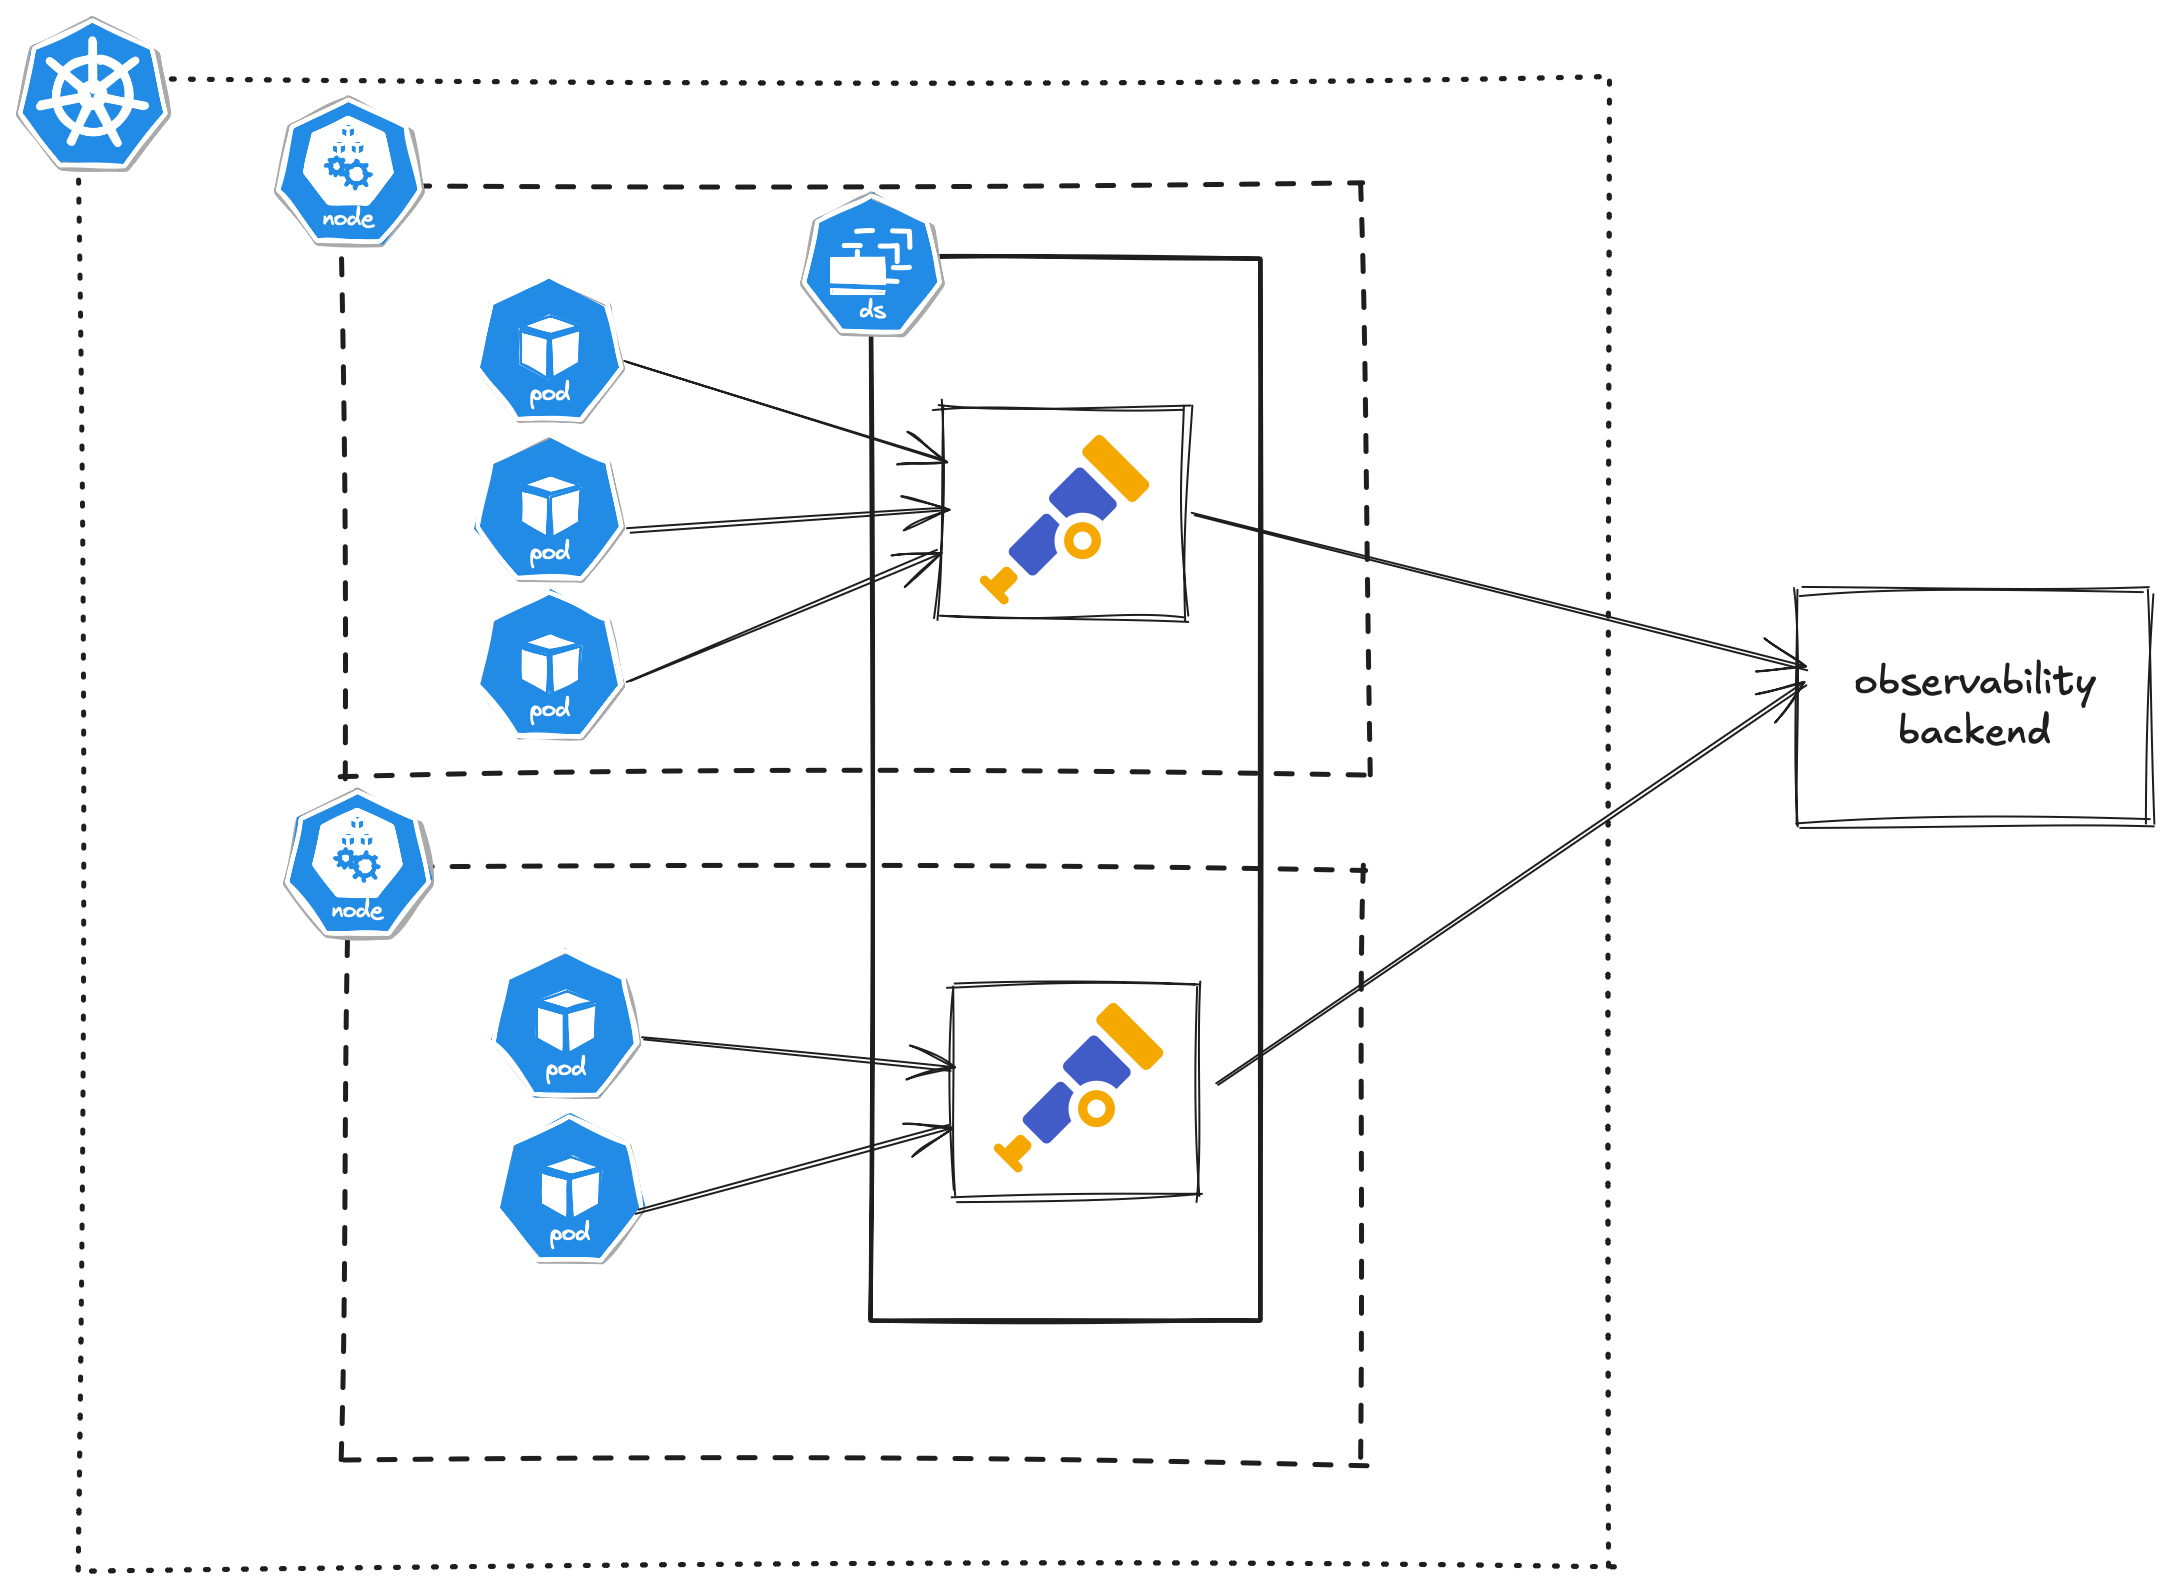
A sidecar deployment looks similar but the Collector container is defined in the same pod spec as your app. The OpenTelemetry Operator can even automate sidecar injection by annotating pods (e.g. sidecar.opentelemetry.io/inject:true), which is convenient. Sidecars are great for isolating telemetry per service, but they do mean you’ll run N collectors for N pods, so consider the resource overhead. DaemonSet (one per node) strikes a good balance between proximity and efficiency.
Gateway Deployment (Centralized Service)
In the gateway model, the Collector runs as a standalone service (one or a few pods) that aggregates telemetry from many sources. Instead of each node having a collector, you might have a deployment of 2–3 Collector replicas and all your applications send data to a single Kubernetes Service (the gateway’s address). The gateway then processes and exports the data to your backend. This pattern centralizes the telemetry pipeline. It’s useful for cluster-level data collection or when you want a single point to apply certain processing (like sampling policies or encryption of data in transit to outside) for all telemetry.
For example, you might run a Deployment of the Collector with (say) 3 replicas behind a Service otel-collector.my-namespace.svc:4318. All apps are configured to send to that service. The Collectors then share the load (ideally behind a load-balancer or round-robin Kubernetes Service). This is easier to manage in terms of updating config (fewer instances to update) and uses less overall resources than dozens of sidecars. However, it introduces a network hop – telemetry has to travel from the app’s node to the collector service over the network – which can add latency and potential bottlenecks. You also need to ensure the gateway is scaled enough to handle the volume (and maybe use a LoadBalancer or headless service for gRPC to distribute evenly). If not scaled, a single gateway becomes a single point of failure or throughput choke point .
How to deploy as a Gateway: Typically, you create a normal Deployment for the Collector. For instance:
And then a Service to expose it within the cluster:
With this, apps can use otel-collector:4318 (ClusterIP service) as their OTLP endpoint. The gateway Collectors will receive all data. You might implement horizontal pod autoscaling on this Deployment based on CPU/memory if load is variable. Do take care to avoid duplicate collection: If you also use the Collector to scrape metrics (say from Kubelet or Prometheus endpoints), a centralized deployment might end up scraping the same target multiple times from each replica. In such cases, a DaemonSet (one per node) is better for those particular receivers.
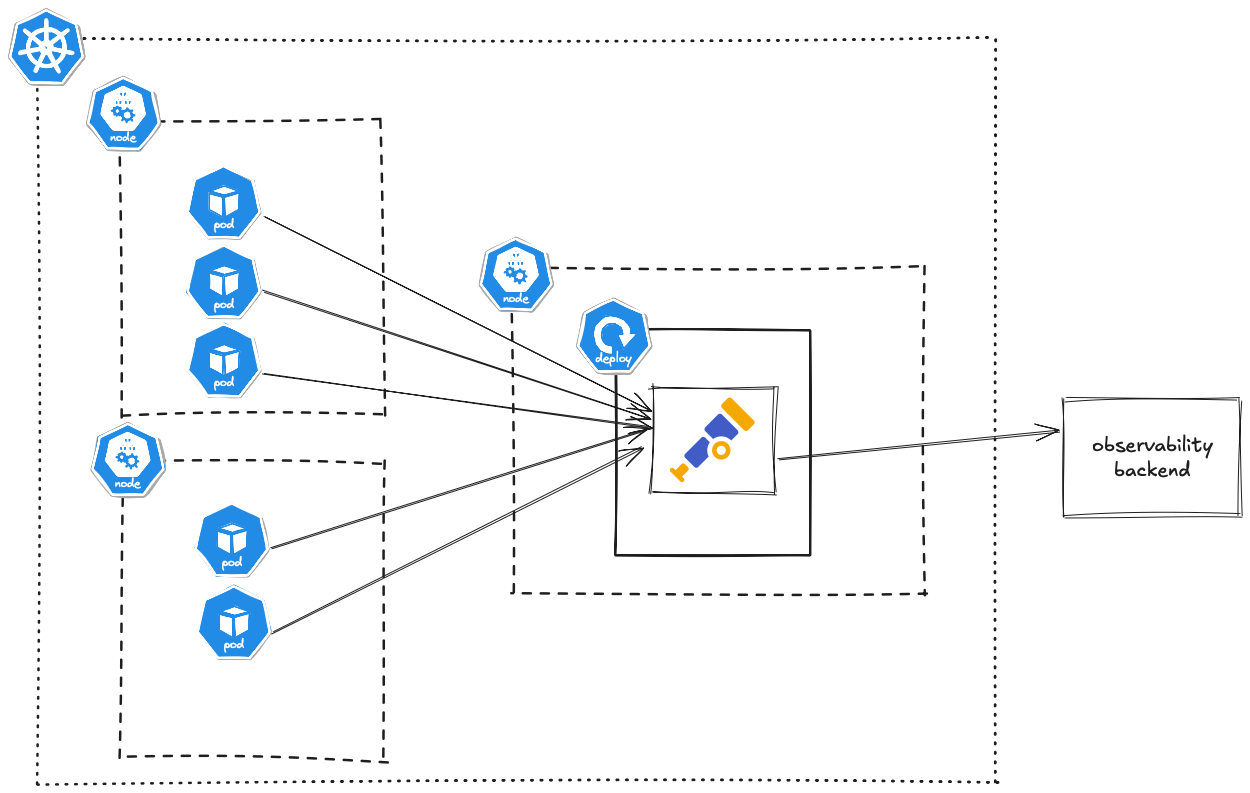
It’s common to use a combination: run an agent (DaemonSet) for things like host metrics that need to be collected on each node, and have those agents forward data to a central gateway for heavy processing and exporting. The agent Collector could be configured to export to the gateway Collector (via OTLP) rather than directly to the vendor, forming a two-tier pipeline. This combined approach offers the best of both: reliability of local collection and centralized control at the gateway.
Which model to choose? It depends on your needs. If you prioritize minimal network hops and per-host isolation, use the agent pattern (DaemonSet or Sidecars). If you want easier manageability and can tolerate an extra hop, use a gateway. Many production setups actually use both: an agent to collect and perhaps lightly pre-process, then send to a gateway for heavy processing and final export. The OpenTelemetry project notes this as a recommended practice especially for large deployments.
Production Best Practices and Tips
Now that we have the Collector up and running, how do we ensure it stays healthy and doesn’t become a bottleneck? Here are some production-readiness tips and common pitfalls to avoid when using the OpenTelemetry Collector in real-world deployments:
- Enable Batching for Efficiency
Always use the batch processor (as we did in the config above) unless you have a specific reason not to. Batching significantly reduces CPU and network overhead by sending telemetry in chunks rather than item by item. It also can improve throughput to your backend. Tune the batch size and timeout if needed to balance latency vs. efficiency. For example, if you want to ensure traces get out within 5 seconds, set a timeout: 5s on batch; if your backend has payload size limits (like New Relic’s 1MB limit), adjust the send_batch_size so that payloads stay under that threshold. Batching is crucial for logs as well, to avoid overwhelming the exporter with too many small log messages.
- Use Memory Limits and Monitor Backpressure
The Collector runs in process and will buffer data (especially with batch + queueing). If the volume of incoming data outpaces the ability to export (say the backend is slow or down), the Collector’s memory can fill up. This is where the memory_limiter processor helps: configure it to a reasonable limit based on your container’s memory. When it activates, it will start dropping incoming data and signal upstream to retry. This is preferable to crashing but it means data may be delayed or lost if the situation persists. To avoid hitting this, try to right-size the Collector: allocate enough CPU/memory for the expected telemetry volume, and scale out (add more Collector instances) if one instance isn’t enough. Monitor the Collector’s own metrics – it can emit metrics like the number of spans dropped due to memory pressure. Set resource requests/limits in Kubernetes to give the Collector breathing room and prevent eviction. In practice, you might give each Collector a few hundred millicpu and a few hundred MBs memory as a starting point and adjust from there. The memory limiter ensures it won’t exceed the set limit by too much, providing a safety net.
- Ensure Retries to Prevent Data Loss
Transient failures happen – maybe a brief network hiccup or the backend returns a 503. The Collector should retry those exports. The good news is that the OTLP exporter has a built-in retry mechanism (using an exponential backoff) and by default it will retry on failure. In older versions of OpenTelemetry Collector, you had to explicitly add a retry processor or enable retry_on_failure in the exporter config. Recent versions enable retry by default, but always double-check the documentation for your specific version. One configurable parameter is max_elapsed_time for retries – by default, the collector may give up after some time (e.g., 300 seconds). If you absolutely cannot afford to drop data, you might set max_elapsed_time: 0 (retry indefinitely), but be cautious: infinite retries could lead to a large memory buildup. It’s often better to ensure high availability of your backend and use persistent queues (see next point) for extreme reliability. Still, make sure retries are on. If using the Collector’s built-in settings, you might not need any extra config as long as you see logs indicating retries on failures. Additionally, monitor metrics like otelcol_exporter_send_failed or logs for “dropping data” messages to catch if data ever gets dropped after retries exhaust.
- Consider Persistent Queues for Extreme Reliability
By default, the Collector’s queue (batch + retry queue) is in-memory. If the Collector process crashes or restarts, in-flight telemetry in the queue is lost. In production, especially when deploying new versions of the Collector, this can lead to gaps. If you require strong guarantees, consider enabling a persistent storage extension for the queue, which will spool the data to disk. The Collector offers a file_storage extension that exporters can use to persist their batches. With this, a restart will reload the queued data and continue sending. The trade-off is disk I/O and complexity. Many users find in-memory with retry is acceptable because telemetry systems are often tolerant to minor loss, but if you’re in a strict environment (e.g., audit logs), persistent queues are worth exploring. To use it, you’d configure something like:
extensions:
  file_storage:
    directory: /etc/otel/spool

exporters:
  otlp:
    endpoint: ...
    headers: {api-key: "..."}
    sending_queue:
      storage: file_storage
And include file_storage in the service extensions. This is an advanced setup and ensure the disk (or persistent volume in k8s) has enough space.
- Tune Timeouts and Resource Usage
Longer export times can cause backup in the pipeline. The OTLP exporter default timeout might be 10 seconds for gRPC. If you find that in high load scenarios you hit timeouts, you might increase this value to, say, 30s. However, if your backend is routinely taking >10s to accept data, something else might be wrong (or you need to reduce batch size). New Relic’s guidance is to increase exporter timeout if you send very large batches or have slow network. On the flip side, you don’t want it infinite, or the Collector could hang indefinitely on a stuck request. Find a balance (5-15s is common for trace/metric exports). Also verify that your backend isn’t rejecting data due to size – e.g., keep payloads under 1MB as mentioned earlier for New Relic. If you enable compression (gzip or zstd), it will reduce payload sizes and often speed up transmission; the Collector uses gzip by default which generally is good. You can consider switching to zstd compression for better performance if your backend and Collector version support it. Keep an eye on CPU usage – compression and large batch processing can be CPU intensive. If CPU is a bottleneck, you might reduce batch sizes or scale out more Collector instances so each does less work.
- Avoid Overloading a Single Collector
One common pitfall is routing all telemetry through a single Collector instance without realizing the volume. If that instance can’t keep up (CPU pegged or memory thrashing), it will start dropping data or falling behind. In Kubernetes, if you use a Deployment (gateway) with a single replica for simplicity, monitor its resource usage. You may need to run multiple collectors and load balance among them. The Collector is stateless for traces and logs, so scaling horizontally is straightforward (metrics can be trickier due to stateful scraping – ensure a single-writer principle for each metric stream). Use Horizontal Pod Autoscalers or manually set 2-3 replicas for the gateway to handle spikes. If using DaemonSet, you automatically get scaling with the cluster size, but if one node has an unusually high telemetry volume (perhaps many pods), that node’s agent might be struggling. In such cases, consider deploying an extra sidecar for that pod or increase resources on that node’s agent. The goal is to prevent any single Collector from becoming a bottleneck.
Also be mindful of telemetry volume – sending every trace, log, and metric from every service at full detail can be overwhelming. Best practice is to filter and sample data before it hits your backend (and possibly before it even leaves the app or the agent). You can implement tail-based sampling in the Collector (there’s a sampling processor for traces) if needed to reduce volume. Or at least sample at the SDK level for very high-traffic services. Overloading the Collector with too high throughput will either crash it or incur lots of data drops. Gradually increase load and see how it performs, rather than turning on everything at once in production.
- Monitor the Collector Itself
Treat the Collector as part of your production infrastructure – monitor its health and performance just as you would any service. The Collector can emit its own logs, metrics, and traces about its operation. For example, it can report how many spans it has received, how many it exported, if any were dropped, its memory usage, GC pauses, etc. You can configure a prometheus exporter/receiver pair on the Collector to scrape its metrics and send to your monitoring system, or use the health_check extension which provides an HTTP health endpoint. At minimum, check the Collector’s logs for warnings or errors (e.g., retry attempts, dropped data messages). New Relic’s backend (and others) also often provide feedback – for instance, if your data exceeds attribute size limits, New Relic might send back NrIntegrationError events or log warnings. These are signs that the Collector is sending data the backend can’t accept (perhaps a too-large attribute or missing required field). Incorporate those signals into your monitoring. If you see sustained errors or dropped telemetry, react by adjusting config (e.g., truncate attributes using a processor if they’re too large , or increase resources, etc.).
- Upgrade and Update Carefully
The OpenTelemetry Collector project is under active development. New releases come out regularly with improvements, bug fixes, and sometimes breaking changes in configuration. When running in production, stick to a released version (avoid running a random :latest image long-term) and test new versions in a lower environment. Check the changelog for any changes to default behavior (for example, the change where after a certain version, data is dropped after retry timeout by default). Also, consider using the distribution provided by your backend vendor if they have one (e.g., some vendors offer a custom build or at least a recommended version that they support). But generally, the upstream OpenTelemetry Collector (especially the “contrib” build with many integrations) is very solid by late 2024 and is used in many production systems. Just make sure you’re not on a very old version that might be missing these features (batch, retry defaults, etc.) – the guide here assumes a relatively recent version.
To summarize the best practices: use the Collector to its strengths. Decouple your app from direct exporters (use OTLP to a local or remote collector). Enable processors like batch, retry (should be on by default), memory limiter, and any data sanitization you need. Right-size your deployment (either one-per-host or centralized, or both). Keep an eye on it – a misconfigured Collector (e.g., no batching, or too small memory) can drop a lot of data silently. Avoid common pitfalls of sending too much data: if you don’t need high-cardinality metrics or verbose debug logs, don’t ship them unchecked. The Collector gives you knobs to drop or sample those. And finally, test your observability pipeline under load. It’s better to discover in staging that your Collector needs tuning than to find out during a production traffic surge that telemetry is getting lost.
Moving from OpenTelemetry experiments to a production deployment is a big step, but the OpenTelemetry Collector makes it much more manageable. In this guide, we covered how the Collector works, how to configure it to receive all your signals and send them off to an OTLP-compatible backend like New Relic, and the key considerations for deploying it on Kubernetes. The Collector is a powerful ally for your observability: it abstracts away backend specifics, lets you process data in-flight, and adds resilience to your telemetry pipeline. By using the Collector in either an agent or gateway mode (or both), you gain flexibility to evolve your observability strategy without touching application code – whether that means switching vendors, adjusting sampling rates, or enriching data with new attributes. Remember to apply the best practices around batching, resource limits, and monitoring, and you’ll have a robust, production-grade observability setup. OpenTelemetry is all about getting telemetry out of your systems reliably and consistently; with the Collector in place, you’re well on your way to achieving just that. Happy tracing (and measuring, and logging)!


